

How to Make a Pair of Beaded Earrings Tutorial
Make your own beaded earrings using a few simple materials
For one pair of earrings, you will need the following items:
- 2 x Headpins
- 2 x Earring Hooks
- 2 x Spacer Beads
We also sell a range of earring kits which include everything you need to make a pair of earrings, apart from the beads and the pliers.
Step-by-step instructions for how to make a beaded necklace:
Step 1:
Headpins have a small 'flat', 'ball' or 'fancy' stopper at their base. When making earrings, these stoppers allow you to thread your beads directly onto the headpins. If the beads you have selected have large holes, you may also wish to add a spacer bead at the base of the post to increase the size of the stopper. (See diagram below).

With this in mind, thread your beads onto the posts in your chosen design.
Step 2:
To create a single loop at the top of your beads, you will need 1cm of exposed headpin remaining above the beads. If you have more than this, use flush cutter pliers to trim off the excess wire. If you have less, you will need to remove beads until 1cm of wire is exposed.
Step 3:
Creating the loop at the top of your earring using your round nose pliers requires a certain grip. Holding the pliers in your dominant hand, rotate your wrist so that your palm is facing upwards. Bring your headpin from underneath and place the top of the 1cm length of exposed headpin 1cm from the tip of the round nose pliers. The wire should be flush to the prints of the plier so that you can run your fingertip over without feeling any wire poking out.
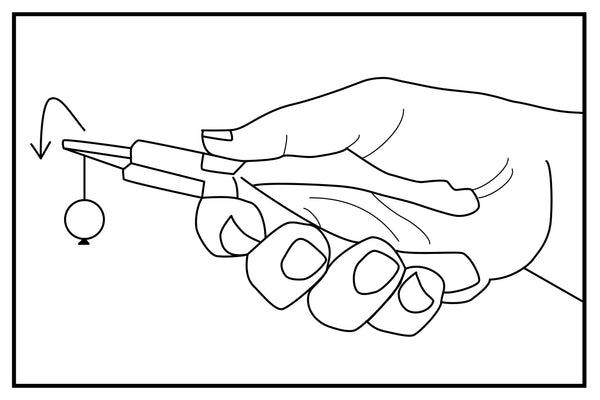
Step 4:
Once you have the correct position, use your round nose pliers to bend the headpin away from the bead to create a 'kink' next to the bead. Keeping your grip of the pliers, then rotate the wire towards you, keeping the wire tight around the round prongs to create a perfect loop.

Step 5:
Bring the headpin loop round so that the wire tucks into the top of the bead neatly. You will have now completed a 'charm' that can be easily connected to an earring wire.
Step 6:
To open the connecting loop at the base of the earring wire, take the chain nose plier and position it on the base loop underneath the hook. Push the loop open by tilting one side forward rather than damaging the shape by pulling it outwards.

Step 7:
Hook your charm onto the loop and then close it again using your chain nose piers. Repeat all stages to create a pair.
Happy Beading, and don't forget to check out our Free Jewellery Making Video Tutorials.